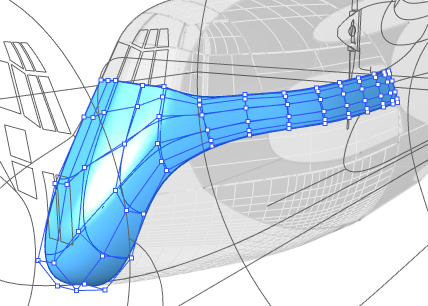
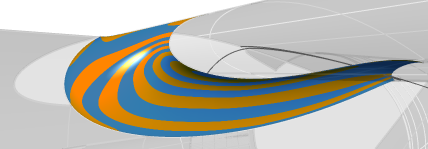
For the first time since I wrote it back in 2001, I've redone my C-130 tutorial from scratch. It was interesting seeing how different it was doing it now versus back in V2 days, and how different it wasn't--after all, NURBS were developed for making airplanes so it's not like some products people work on where new features have made what was previously not practical in 3D possible. The improvements to blending were a big help. I did make some limited use of the new Universal Deformation Technology. Probably the biggest time-saver was the little thing of now being able to use multiple edges for surface matching and sweeping. Some things that were very difficult unless you knew the special trick you could only learn from my CD(or the Version 1 tutorial I got it from)became trivial.

If you take a look at the
sample page from the original version, the layout's been changed to match the other two--one of the reasons I decided it was time to roll them
all onto one CD for only $99, operators are standing by. ;-)
I am actually a little disappointed about that, I did like the old look very much, the project was as much a design experiment with that as it was about the 3d. I wanted a design that was actually intended to work better on-screen than printed, inspired to a large extent by the musings of
Scott McCloud.Unfortunately the process was incredibly complicated and too cumbersome to edit, especially after I lost track of the mess of scripts and macros that pulled it together. I don't even remember how it went, I'm flabbergasted to think of the stuff I did back in the primitive scripting days of V2. The process was generally something like this:
- In Rhino, I had every single step saved as a separate model, many of them in each file. I had crude brute-force mechanisms to do things like save the appearance of selected control points, separate new and unchanged objects, save the views of screenshots, set grid settings according to the scale of the view, and output all the shots for a file with the touch of a button.
- I wanted to do some things with the screenshots that couldn't yet be done in Rhino so part of the output process was to 'composite' them in Photoshop. One of those things was antialiasing, which at the time you could only control through your video card, but I still wanted grids and curves 'crisp,' so I...somehow managed that flipping back and forth.
- The pages were actually assembled in InDesign. That was alright, the way it handles text is awesome.
- Then the problem was how to get that out of InDesign into something that would work in a browser. It's "HTML export" wasn't acceptable then (probably wouldn't be now)so it was necessary to turn the pages into big pictures.
- InDesign didn't have raster export, so I had to export as PDF(after breaking the pages up according to the maximum page size)and use ImageReady(no, not Photoshop) to convert them and slice them up.
- To do the printable version I had scripting in InDesign to compress the spacing between the images and split it into page-sized chunks, which I then transferred into a new file.